Pages

Showing posts with label make it. Show all posts

September 11, 2012

Hacking my 2013 calendar

Since I started teaching knitting and quilting classes at Joann's, I've needed a small planner in which to keep track of things. The first year I made my own, and the next year I found one by Carolinapad.com that worked even better. Unfortunately, the style is discontinued. So my search for an inexpensive monthly/weekly smallish tabbed planner has been in progress for a while. I am pretty picky.

Then I ran across another Carolina Pad calendar in the back-to-school section. It was nearly perfect. $4. Tabs. Month and week pages. Squares big enough. The whole thing close to small enough. The downsides:  Wire binding. Curling corners on the plastic covers. Too many months (18) and unneeded reference pages making it too thick. Here are two Before pictures, borrowed from Carolina Pad's online store:

See that big wire binding just waiting to be squished, catch on things, and help rip pages.
The weekly pages are big enough to record ideas, expenses, and student info.
My options were to keep looking, design and make my own, or hack this one. You know which from this post's title.

The front.
Here you can see a new plastic binding and the ends of the elastic that holds the calendar closed. I have a few coils around because I have a punch for making spiral bindings. It turns out that metal comb bindings like the one on this calendar are spaced at exactly twice the distance as the spiral bindings, so I threaded the plastic coil twice through each hole. My original thought was to repunch everything, but there lies madness if every punch is not perfect. Avoiding madness is a good thing.

The back.
On the back you can see the long section of elastic (mine is 5/8 inch, I'd have used narrower, but this was the only black elastic I had). It keeps the corners of the covers from curling. Using a craft knife, I cut small slits in the cover (you can place them on the back cover if you want the long elastic on the front), inserted the elastic, glued it, clamped it, and waited overnight. Here's a close-up of one corner of the inside front cover:

Placement of the elastic.

How long should your elastic be? How long did I make mine? Long enough to hold the calendar closed without stressing the elastic or curling the book. My book is 3/8 inch thick and 8 inches high, I figured that 8 inches plus 2 inches fold-over twice (12 inches total) would work fine and it does. The elastic has to stretch 3/4 inch (twice the thickness of the book). When you glue, make sure the elastic is NOT wrapped around the book.

Shown just because are the new binding from the inside, the tabs I didn't have to make myself, and the nice big squares on the monthly calendar pages.


One thing checked off my shopping list.


November 10, 2008

Multitasking

Recently I got a vintage Schwinn exercise bike and rediscovered that time slows incredibly when watching the timer, even with the radio on. So I built and installed a simple book shelf for the handle bars.


The scrap of plywood is bolted to two smallish L braces which in turn are clamped to the handle bars with hose clamps. It's easy and requires no permanent modifications that might degrade the bike's collectability. LOL Just kidding; you can barely give these things away anymore.

Scrap of rubbery drawer liner keeps my book from sliding off. Now I can read and pedal until either 1) the timer sounds or 2) my rear goes numb. When it's the second event (which it usually is now that I'm building up a tiny bit of stamina), I get off the bike, march around for a minute, and get back on.

I'm exploring options and experimenting with available materials to prevent NBS (Numb Butt Syndrome). I'll report if I find a solution that doesn't involve temporary dismounts!

October 24, 2008

Fall vegetables

My tomatoes are finally ripening. I made turkey chili the other day, using tomatoes and baby zucchinni from my washtub garden. It was and continues to be yummy! It made enough that I had to freeze half of it.

It's hard to make out the tomatoes against the V8 juice. Also in there is a pound of browned ground turkey breast, celery, and onion. To be added shortly are black beans, pink beans, chili powder, and much later a splash of vinegar.

Also in vegetable news is this dirty carrot that blogless Louise grew and decided to share with me and, via the internet, you:

September 10, 2008

Surge Protectors Serge Cleaning Cloths

Paper towels last a long time at my house (a couple of years, at least, per roll) because I use these 99.9% of the time: Those are well used, fraying towels cut down to approximately washcloth size. The edges won't fray because I do the cutting and hemming on a serger. The advantage to this size is that dish rags, washcloths, and my cleaning cloths fit this handy cleaning tool... ...purchased at a thrift store. No disposable Swiffer cloth has never crossed my threshold. If you noticed all the dangling thread chains, well spotted. The last two steps in cleaning cloth creation are dabbing on Fray Chek to lock the threads, and after that's dry, cutting the threads off. Some of the cloths are much smaller—as small as 3x5 inches—because I had to work around holes or tears. These mini rags are also handy; one resides with my spinning wheel. I see a number of other knitting bloggers post about knitting swiffer cloths, but I bet if they had a serger they'd be using it this way, too! Here are more swiffer options that Google revealed. My cleaning cloths collection does include several old knitted dishcloths which do fit my swiffer and do a great job. Cheerios for now!

June 19, 2008

Wooly Garden and Triangular Dolly

Sometimes I get a kick out of being weird. Well, most of the time. LOL For example, my vegetable garden started out on wheels. Now it's on the old pickanick (remember Yogi?) table where it will be easy to find those baby zucchini before they become monster-sized.


After planting a zucchini, several lemon cucumbers, and a cantaloupe (which I hope will recover from my letting it dry up too much) in potting soil and compost, I covered the dirt with wool.

What! you say? Wasting wool on gardening? Not really. That wool wasn't going to do anyone any good for crafting anything nice. The batt was dyed with something that bleeds profusely even after a dozen washes. It was also felted, probably accidentally judging by the various thicknesses and holes in it. As mulch, it will hopefully be keeping the soil moist and the roots warm. Water flows right through. It was easy to install.


See those buds? Baby courgette will hopefully follow.

I mentioned wheels. Because I did nearly everything bass ackwards, I had the washtub planted before I moved the table to the best location. So the washtub was on wheels for a while so I could move it around easily. The wheels? An invention of my own:


Three salvaged swivel casters pinning three sticks into a triangle. The sticks are about 20 x 1 x .7 inches with holes in both ends. The holes are barely big enough for the caster stems, and the slight angling caused by the over/under layering of the sticks puts just enough pressure on that it stays together. I hope. I did play it safe and wedged a small nail alongside each stem. Have you noticed how it looks kind of like a recycle symbol? LOL This simple little project definitely qualifies as Reduce (back strain) and Reuse (sticks, casters).

Now that the wash tub is on the picnic table (thanks to Louise and Mattie who went for a walk and passed just in time to help lift it onto the table), my triangular dolly is under a stack of tires. It is so much easier to move stuff around with wheels!

February 27, 2008

Tension can be desireable

No tension here:


This is Pepper who you've met before, but not upside down like this! And here's the hat I knit from my second skein of my very own handspun.


Just a simple top-down stockinette cap with rolled brim, knit on size 9 US dpns with five increases every other row starting from a very short 3-stitch I-cord.

I've completed the 2 spools of singles of the drum-carded wool/mohair fiber that came with my wheel. My treadling speed is still pretty variable, so I found an online metronome to help me steady my pace.

I decided to be a little more careful plying it, and after finding this article about plying, wound the singles onto TP cores using my ball winder, stretching out the overspun kinks as I went. TP cores fit perfectly on my ball winder and should help keep the kinks from reforming why plying.

Then I assembled the first of two tensioned lazy kates, shown here with the aforementioned singles:


This first version uses a long rubber band to gently stop the ball from unwinding, but because the TP core is hollow, it tends to flop a bit on the axle. The trimmed pipe insulation (at left in this next pic) stops the flopping, and causes tension when it's pulled out of the core just far enough to make the insulation and core rub just a little bit against the plastic box. To make two lengths of the pipe insulation fit in the core, I cut about a half inch lengthwise off each piece. The pipe insulation is very inexpensive (free if it's already in the garage!) and cuts with ordinary scissors. The neat thing about this version is the insulation holds the axle in place so I don't need to add "nuts." Here's version two with my second ball of singles:


Next I'll convert the first kate into one like the second and onward to the actual plying. TTFN!

PS: Here's another blogger who made a tensioned lazy kate not unlike mine. And another. And the third one.

PPS: This one is wooden. This one started life as a wicker basket.

January 30, 2008

Hacking an Antique

One of the blogs I read is Ikea Hacker, a collection of projects people have made using Ikea products (or pieces of same) as raw material. Although I don't currently have any Ikea items I want to hack (I live in hope, though!), I have this antique...

An antique piano bench built by my great uncle around 1900 is the almost perfect coffee table. It's well made, in very good condition, and sturdy. It's Mission style which coordinates with my other furnishings. It's only functional imperfection is that the storage compartment under the seat can't be accessed if there's stuff on top. My coffee table always has stuff on top.

For a while I considered installing a drawer into the under-seat area, but I didn't want to cut up, drill into, or otherwise damage it. It does have a narrow board (aka stringer) between the two pair of legs that could easily support shelf.

After playing with the idea of a metal shelf with crenelated ends to mesh with the vertical slats and legs (I lack sheetmetal skills) and an upholstered shelf with fabric ties like a chair cushion (too "country" and maybe to floppy), the best idea popped: a shelf clamped to the stringer. I could do this! And so I did:


Here's the underside of the clamped shelf:


Here's what I did:
  1. Cut a board to fit, allowing about 1/4 inch for wrapping the fabric around.
  2. Covered the board with fabric (a reused piece of upholstery) using a staple gun. I avoided putting any staples where they could touch the bench itself to avoid scratching. See B in the pic.
  3. Cut two lengths of narrow board (or thick lath or rectangular molding) the same thickness as the stringer (A in the pic) the shelf will sit on.
  4. Screwed the narrow boards onto the shelf bottom so there was room for the supporting stringer plus about 1/4 inch. See C in the pic.
  5. Laid some felt (D in the pic) in the resulting channel. It was as long as the board and wide enough to wrap around the stringer A. I did the trimming after the clamping.
  6. Cut three pieces of 3/16 inch plywood (E in the pic) about an inch wide and long enough to span A and overlap the two Cs.
  7. Lined everything up, folded the felt over, drilled pilot holes, and screwed the three clamp pieces (aka E) to the two Cs.
Now I have an accessible place for remote controls and a small knitting basket. I'm a happy hacker!

January 21, 2008

Returning with 'Poo-free Hair

Last May, Kathy at A Vast Amount of Spare Time posted about not using shampoo to wash her hair. Hmm, I thought. Maybe this will cure those little bumps I get on my scalp. After some experimenting, denial, and accidental or unavoidable use of shampoo, I've settled on a variation of her baking soda and vinegar regimen.

In my shower, I keep a former shampoo bottle (well rinsed!) that has a small dispensing hole (a dish detergent bottle would work, too) with baking soda and water. I start with 1/2 soda, but as the level falls with use, I add water. The quantity of soda isn't critical and depends on how much hair and how big a head you have. If you don't have a funnel for the soda, mix the solution in a pitcher or big measuring cup and pour into the bottle. I also keep a spray bottle filled with water and vinegar (Kathy suggests apple cider, but I had white on hand), about 1/4 vinegar.

To clean my hair, I wet it well, shake the soda bottle (finger over the hole) and apply a spiral on my hair (usual two circuits starting near the edge and finishing near the crown), massage into the scalp with my fingertips, rub all over with my palms and fingers, and rinse well. (You'll get some dribble and you can use it to clean behind/in your ears or even your face and neck. It's mildly abrasive which can be good.) Once the soda is rinsed out and my hair is still very wet, I grab the vinegar spray bottle, close my eyes, spray a few times (maybe 4, again, your mileage may vary) around my head, rub it around around a little bit to distribute, and rinse. You can, if you wish, use the vinegar rinse on alternate days or even less frequently. It does ensure there's no soda left in the hair and makes your hair shinier than with soda alone.

I found the measuring cup method to be cumbersome and much prefer the premixed solutions. And it did take a week to get my scalp and hair used to the change. Those little scalp bumps don't appear when I use the soda and vinegar, either. Even baby shampoo causes them. Additional benefits of this system are its very low cost and small environmental impact.

Regarding knitting, I'll have posts about completed projects (including my Mystery Stole 3), my new-to-me spinning wheel and an incredible fiber purchase via Craigslist, and so on soon. I've been a bad blogger.

June 20, 2007

Mystery Stole Swatch Results


Yes! There's a hole in the gray swatch! And if you look closely, there's a missing YO in the green one. Now that's over with, let's celebrate 3 swatches done yesterday. LOL

The details in order of knitting:

Gray Swatch: mystery wool on cone (10.5 ounces), 28 WPI, two strands held together on size 2 US, blocked to approximately 5.5 inches wide, 4 inches tall. If I choose this, I'll go with three strands plied together somehow (not having a wheel...) because unplied, I'm going to be sticking my needles between strands a lot. Finished width approx 18 inches. The math: 5.5 inches/35 times 99 stitches times 120%. Melanie has revealed the stole is 99 stitches wide.

Green Swatch: mystery wool on cone (21 ounces), 24 WPI, one strand on size 4 US (bottom) and size 3 US needles, blocked to approximately 6 inches wide. I like the size 4 results better. I'm leaning toward using this yarn. Approx 20 inches wide finished.

Blue Swatch: Shetland wool on cone (12 ounces), 18 WPI, one strand on size 4 US, blocked to approximately 6.25 inches wide. I like this color best, but overdying either of the other two is an option. Approx 21 inches wide finished.

Any opinions? Is my math OK? Please comment!

BTW, I unvented a WPI tool from my wood scraps box: a piece of tinker toy. Perfect! Love that Reuse part of the three Rs. LOL This is such a simple concept. One could make one from a piece of doweling very easily if there are no kids around from whom you can beg a stick.


As to the wrapping, I let the yarn decide where to fall by angling it slightly toward the already wrapped strand as I twisted the tool, pulling the yarn just enough to snug up to the tool without being overly tight. Is that the right way to do it??

June 07, 2007

Grandma's Spice Sauce

My grandma spent her youth as a professional musician in the Weber Junior Orchestra touring the US and Canada. Here she is, leftmost in the front row with her mandolin:


Grandma, who I loved dearly, wasn't the greatest cook, but she tried hard and had some tried-and-true recipes. Grandpa had paid for cooking lessons when they married. She used to make Spice Sauce to drizzle over pie, cobbler, and ice cream (not all at the same time, usually!). My sister recently asked if I had the recipe, since I am Keeper of Grandma's Recipe Box. The wooden box is labeled inside with her maiden name and "From Elgie 1919." It appears that my grandpa knew what grandma's cooking skills were like going in. LOL

Anyway, I found the recipe. It was actually in my handwriting; some time in my youth I noticed her card was way beat up and copied it over for her and made another for me at the same time.

tiny
space
Grandma's Spice Sauce

Blend in a small saucepan:

2 T flour
1/2 t nutmeg
1/2 t cinnamon
1/2 t salt
3 T sugar
1 1/2 c hot water

Cook slowly, stirring constantly until thickened. Stir in until melted:

1 T butter or margarine

Serve hot over pie, ice cream, cobbler, or anything else you fancy.

I was telling Louise about it today, and she mentioned making a similar sauce but with lemon juice and rind to put on gingerbread. A little googling later, I found these two Mrs Beaton traditional recipes. I wonder how they'd be over berries?

May 08, 2007

Playing with Fire: RRR Striped Candles

Despite a lapse in blogging, I'm still knitting, but it's not blogworthy yet. Last night I 1) punched a hole in my left index finger with the knitting needle (size 3, cotton blend yarn with zero stretch, say no more) and 2) ripped back over half way because the object was too big and I want to do the sides differently. I'm making this thing up as I go.

So in the mean time, an earth-friendly project for you to try: RRR Striped Candles.

First, an explanation of my RRR claims for this project:

Reduce: Buy fewer candles by using all the wax you already have. Melt wax without using gas or electricity (yes, it takes longer to melt wax over candle flames, but that's why I call it "playing with fire! LOL).

Reuse: Use your candle and canning jars over and over again, and reuse metal wick bases.

Recycle: Melt "used up" candles into new ones, and use bits of metal for wick bases.

Cautions and Warnings: Playing with fire can be dangerous. Choose a fire-proof work surface and do not leave burning/melting wax unattended. Keep children and pets away. Use potholders or gloves to avoid burning yourself. Use your noggin!


Materials:
  • Wire core candle wick (I use Yaley Medium Wire, item number 110161 (yes, a 75 yard spool, purchased with a 40% off coupon long ago)
  • Wax scraps (remains in jar candles, taper stubs, faded votives, etc., but NO CRAYONS--it is a myth that they're good for coloring candles)
  • Wide mouth canning jars (pint, half pint) or clean, empty candle jars
  • Potholder(s) or gripper-dot gardening gloves you don't mind getting waxy
  • Timer
  • Optional: bowl with ice cubes and water, or refrigerator, or cold outdoors.
Method:
  1. Set up a couple of jars as shown here on a fireproof surface such as your stove top, large cooky sheet, or sink with the drain stoppered (you DO NOT want to get wax down the drain). Light the candle in the lower jar and put bits of wax to melt in the upper jar. Don't put too much wax in; you don't want it to overflow.

  2. While the first stripe is melting, prepare the wick. It should be about an inch longer than the target jar is deep and needs a small metal base. You can use a used base or fashion one from an all metal paperclip, pour spout, or whatever is in your metal recycling bin. The idea is to have enough horizontal surface to hold the wick upright.

  3. Even though the wax isn't ready to pour a stripe, pour a puddle into the bottom of the target jar and stick the wick base in it, centering the wick in the jar and supporting the wick until the wax hardens enough to support the wick. Straighten the wick gently.

  4. Now wait for the timer to ring. When it does, check the melting wax. If necessary, you can reset the timer. You can also sneak in a few more bits of wax if there's room.

  5. When there's a good-sized puddle of melted wax in the upper jar, use your potholders/gloves to pour it into the target jar. Put the target jar in a cooler spot than next to the burning candle.

  6. Repeat.
Nuances for Success:
  • The candles I liked best had stripes in the same color family. This is one way of experimenting with color theory; you can try adding bits of blue, green, and yellow wax to red to vary the colors of the stripes, for example.
  • To get wax out of containers too small to melt in, put them in the freezer for a while and then bang them on a padded hard surface (e.g. potholder or folded towel on the counter). Wax shrinks when it's cold.
  • For better melting and burning, mix types of candle wax (taper, jar, votive, paraffin wax, beeswax) to sort of "average" the wax. Each type has different characteristics and melting points.
  • To prevent the hole-in-the-middle problem from wax cooling more slowly in the middle, pour shallow stripes and let the candle cool really well between pours. A shallow stripe will still "dish" a little, but much less than a deep stripe.
  • To prevent bits of wick, black gunk, or wick bases from being poured into the target jars, pour slowly and then scrape the gunk out with an ice pop stick (or similar object) before adding more wax.
  • If you have really dirty wax, you can pour hot wax through a filter of some kind. I used a piece of calico in a beat up wire strainer. Or line a metal funnel with fabric or coffee filter. Just be careful not to spill wax all over!
  • For faster results, set up several pairs of jars and target jars.
  • After each pour, encourage the wick to stay in the center.
  • To relieve boredom, knit between rings of the timer. Or even do housework. Nah!
Cleaning Up:

While a freshly-emptied jar is still hot, wipe it inside and out with absorbent paper (which makes good fire starter later if you have a wood stove or fireplace). If you don't see any more wax, you can wash it safely.

If you have a bunch of candle holders or containers that need cleaning, you can put them upside down on a paper-covered cooky sheet and bake at 200 degrees for 10 minutes. Most of the wax runs down into the paper. Wipe the hot containers with absorbent paper and wash. Again, the waxy paper is good for fire starting. You could also compost it (assuming no metal is attached), but you shouldn't recycle it.

Enjoying the Results:

The pint canning jar candles with the size of wire wick I use burn down leaving a coating of wax on the sides about 1/8 to 1/4 inch thick. It makes for an attractive glow. When the candle burns out, I'll be able to put a votive in the bottom to continue enjoying the glow.

One of the negative side effects of burning candles is soot. I have found that I can prevent much of the soot by 1) putting the candle out by pushing the wick briefly into its pool of wax using a chopstick and 2) trimming wicks to a quarter inch before lighting them again.

As Annie says, burn, baby, burn!


February 20, 2007

Why I Need Needle Keepers & How I Made Some


Does this really need a caption? I didn't think so. A while back it occurred to me to make a "sock suitcase" out of an eyeglasses case. It worked fine once I got needles short enough to fit inside. Then I saw these pretty beaded point protectors and was inspired to make some for me from stuff in the stash.


This set fits the needles I used for Stulpen. The plastic caps are custom screw protectors I got at Scrap. The stretchy stuff is 1mm elastic beading cord, 4 strands braided together. I used a 1/8" hole punch to make two holes in each screw protector (couldn't get the punch inside, so I punched through both layers). I weaved the ends of the elastic through the braid which is why the right half looks so lumpy.

This set was next, made for my new 10cm bamboo sock needles:


This set is basically the same except the elastic isn't braided. I knotted a longish (about five times the length I needed between the holes in the screw protectors) piece of elastic, doubled it as you would wrap a rubber band around something, fished the doubled band through a hole in each screw protector (a crochet hook was invaluable), and poked the screw protectors through the protruding loops. Sort of like making a Chinese jump rope. The result is better.


I think that's the best picture (technically, anyway) in the blog so far. I'll get the hang of digital photography one of these days.

If you want to try making these gadgets yourself, some hardware stores have screw protectors (they aren't always called that) in various sizes. The caps off of dried up markers might work, too (you'd have to use a drill to make the holes). Have fun!

Added 8/7/07: I just did a bit of searching (googled "screw protector") and found this site, and others. I'd try your local Ace Hardware store first so you can actually handle the screw protectors and try them on your needles. And no, I don't own stock in any of the screw protector stores! LOL

Needle Rolls: An Epic Adventure

This is the first needle roll I ever made (in high school!); its wool felt, not the acrylic stuff mostly available these days. It used to cost 10 cents a "square" at Newberry's, and I went through a lot of it.


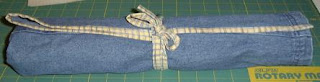
Several decades later, I made this needle roll for my nephew-the-knitter for Christmas this year. The denim is from a skirt, and the three black & white fabrics are quilt scraps.


Inside the roll, you can see the three-layer pockets with a couple pair of needles barely visible. The width of the slots gradually increase from left to right.


Here's the other needle roll/Christmas gift I made this year, also made from reused denim.


Here's the inside. I wanted the pockets to be able to hold multiple pairs of needles, so they're not flat, but puffed up. I sewed the vertical lines first, then across the bottom, pleating the excess fabric as needed. I like it much better than the flat pockets. The buttons mark the size on alternating pockets.


The color here is poor, but you can see the needle size written in permanent marker on the button. You can also see the pocket easily holds two pair of needles.

The giftee of this needle roll also has some circular needles, and after consulting with her and looking all over the web for ideas, a really odd idea occurred to me, resulting in this:

That's the bodice of the dress the denim came from. Really bizarre, but highly functional! The fabric panel sewn to the back has five slots for holding circular needles. The waist is sewn together to form a bag, and hook & loop tape is in the sholders to keep the bodice on the hanger. The needle roll, books, yarn, or whatever can be stored in the bag, and the whole thing can hang in the closet. Both Louise and I liked the idea of the slotted needle hanger for reducing kinks in the cables, but there wasn't much of the skirt left. One of the needle hangers I saw in a blog had straps attached to a slotted fabric panel for suspending on a hanger, and they provided the inspiration of using the bodice. After all, it was already the right shape for a hanger.


Now it's a few days later and I ran across a piece of lavender ultrasuede and a coordinating cotton stripe in my stash. This resulted:


Since Ultrasuede doesn't ravel, I only needed to cover the edges of the cotton fabric. By semi-sheer coincidence, the stripe fabric was about a half inch narrower than the ultrasuede, which itself was almost exactly the size you see. I trimmed the bottom edge to take the rounded corners off. The resulting 1-inch wide scrap provided the patches to secure the ends of the cotton fabric to the ultrasuede thusly:

You may be aware of my inclinations toward tightwaddery and wonder at the expensive ultrasuede. There's a thrift store in town that sells stuff by the pound, and I ran across the ultrasuede there, snapping it up and hiding it in the bottom of my basket to protect it from other shoppers. That piece cost me less than a quarter. Not that I'm bragging or anything.

I want to label the slots, but this time with rubber-stamped iron-on fabric. Maybe real Bondex iron-on patches, or maybe fabric with iron-on goo added to the back. Any thoughts? Besides reminding me I should have done it before loading the roll with needles? VBG

January 09, 2007

Wire, Beads, Bits, and Bobs

While not original (I saw it here and here) in idea, the row-counter/stitch-marker on the left might be unique in its parts. The ring is actually an earring and fits a US 17 needle with room to spare. I made it for Louise (names have been changed to protect the innocent, or at least the best cookie makers), my knitting neighbor. Technical details on the marker from top down: earring sans wire and squeezed together, hairpin-shaped wire strung with a ceramic pony bead, several biggish seed beads (to make the wire fatter to reduce how much the counter flops around on the wire), the row counter, another pony bead, and another seed beed.


The counter/marker on the right is made with a half a clasp, a head pin, two clear beads, an angel charm, and TAH DAH! the row counter I've had since learning to knit in 4th grade. I hardly ever use it, but there's more chance now than before.

A few months ago I "discovered" stitch markers of the handmade sort in the knitting blogs and fell in love with the concept and resulting objects. Dragging out my beading junk and a big tray, I parked myself in front of the TV and got carried away making markers. Here are just some of them:


The cat charms came from Walmart when I went looking for head pins and those clasps with rings. Other charms had been knocking around in my bead box sometimes for decades. See the silver beads that look kind of like balls of yarn? Those are really cool. I have no idea when or where I got them. The reason only some are shown is that I don't have them any more. So tickled with them, for several days I showed them off to anyone who'd stand still. At the pet shop, three people oohed, aahed, and asked could they buy some. They aren't even knitters! I made a net profit, leaving with fish food and $3 more than I went in with. Such a deal.

See these earrings nobody around here likes?


Stitch marker to be and stitch marker. Maybe I should open an Etsy shop?

April 21, 2005

Magical Comb Binding Trick!

I recently dug out my "home" comb binding machine for a project, and its lingering presence on the kitchen island inspired the creation a new, tough price book out of 3x5 cards for my purse. The results looked good, but didn't work so good because it wouldn't lie flat when turned inside out. Bummer. After a few days of trying to ignore the problem, a possible solution made itself known. Comb binding before cutting into rings
I cut the comb binding apart into individual rings! They hold the cards together fine, and any page can be on top without being bent around the binding. The plastic comb (named because if you could make it lie flat it would look like a giant comb) just needs its spine to make the rings faster to attach and easier to manage. I doubt I'd want to put individual rings on very many letter-size reports, but a few custom note books is absolutely no problem.
The completed price book
Now instead of copying info into a new notebook, I can just take the notebook apart, recycle the unwanted/used cards, add some blank cards, and keep going. I could even insert 3x5 photos, pieces of greeting cards, or whatever fits in the comb binder's punch.
The open and still flat price book
What's in my price book? Mostly lists: window measurements, lists of things I'm thinking about buying, shopping lists, price comparison info for my "regular" purchases, phone numbers, ideas, things to put in my "master" planner, etc. It's rather like a PDA but doesn't need batteries and is less likely to break when dropped.

March 21, 2005

Filter Update

The gravel-in-a-jar filter I made last week is performing better after a minor modification. The standard airline was smaller than the narrow end of the funnel, but not by much, so the stream of exiting bubbles was intermittent (glub, pause pause, pause, glub, pause, pause, glub, ....). I added a length of micro tubing to the airline, and now the bubbles are flowing in a gentle, steady stream.

Yesterday the glub-pause-glub started up. Oh, no! On inspection, one of the snails tried to go into the funnel, blocking the opening temporarily. LOL Everything is back to normal now that the snail got out of the way.

Here's a quick picture. You can't see the bubbles and the fish are blurred because I used ambient light...

March 17, 2005

Making a Filter for a Small Fish Tank

Needing an inexpensive, small, and effective filter for my White Cloud Mountain Minnows' 2.5 gallon tank (which is really an antique pickle jar inherited from my grandmother), I searched with Google for instructions, finding this article from the Minnesota Aquarium Society. In summary, you can build a combination undergravel and box filter using a funnel, flowerpot (without a drain hole), a bit of filter material, gravel, air line, and an air pump. Being genetically resistant to following instructions, I modified them to fit my situation. My filter went together like this:
  1. In the bottom of a squeaky clean Trader Joe's bean dip jar (sans label) from the recycle bin
  2. I put a layer of filter material from my other aquarium's filter (like polyester batting) and
  3. then added a small plastic funnel found in my kitchen, wide part down. The wide part of the funnel should fill the width of the jar but not so tightly that water can't flow through the gap. The narrow end of the funnel should be about twice as wide as the air line so bubbles can easily escape. Mine fit well with only a little shortening that also widened the opening. The point is to get the air into the funnel, so you can put the airline into a second hole in the side of the funnel or, (this is untested), run it down into the filter and up into the funnel but not out the end.
  4. Then I filled the jar, burying the funnel but leaving the end poking up about 1/4 inch, with clean aquarium gravel.
  5. Next I filled the jar with declorinated water and put it into the tank. It is nearly invisible because the glass reveals mostly gravel that matches that already in the tank!
  6. Next I stuck an airline into the funnel and turned on the air, adjusting the flow appropriately.
The minnows and snails are happily investigating their new "boulder," swimming around and climbing on it.