Pages

Showing posts with label money. Show all posts

March 12, 2009

New yarn for old film

Last week I was reading blogs, and Yarn Zombie put out an offer to trade fiber from her shop for old Polaroid film. Yes! My 4 packs of 10-year-old film flew off to Ohio, and this beautiful yarn flew here:


Mmm skeins, indeed. The whole process started Thursday and we both got our packages on Monday. Yay USPS priority mail. Trading is good; unwanted items stay out of the landfill, and it's thrifty besides.

Recently I bought a compact digital camera and made my first video:


We'll just pretend I used a tripod and that you can't see my reflection. LOL

June 28, 2008

Adventures with Karakul


Here's 34 yards and 52 grams of Navajo-plied Karakul yarn I made a few weeks ago. According to the charts, its "super bulky." It's also lumpy, inconsistent, and I know the plying could have been done better, but I was practicing! I practiced spinning thick, practiced long draw a little bit, and I can't remember what all else I tried. Now I know some of what not to do. This yarn has potential for cat toys (always my first plan for using up mistakes; cats aren't particular), locker hooking, and primitive art. Ha.

The gram scale is new-to-me. A bargain at $2 (it didn't even need a battery!), it is more precise than my other small scale which reports ounces and tenths of ounces. This one can be set to Imperial units, showing pounds, ounces, and eighths of ounces. While not as precise as the "drug dealer" scales seen around on various knitting blogs, this one will serve me well.

April 22, 2008

I wonder if Asimov or Clarke had a Roomba?

As I type this unillustrated post, my new robotic vacuum cleaner is running round the house, entertaining both me and the cats while sucking up bits of this and that. Charming until it gets something biggish stuck in it's maw, the Roomba tackling a crafter's space needs an owner handy with a screw driver to perform the robotic equivalent of a Heimlich maneuver. A Roomba's been on my wish list since they were first available. Recently I spotted one at my favorite thrift store for $5. I snapped that puppy up. It had no obvious evidence of damage and was with its charger and a wall hanger. No invisible walls or remote control, but they're replaceable if I find I must have them, but I have no indoor steps and don't really want another remote control to keep track of. Now there was a downside to this bargain. The rechargeable battery was no longer holding a charge. Not unexpected at all. After researching Roomba discussions, retailers, etc. I downloaded its manual and bought a replacement battery pack from an eBay seller for $40 (including shipping). It came with the special triangle-tip screwdriver needed to open Roomba's battery case, and it was a fast and easy process inserting the new batteries. They charged up fully over night. Yay! $45 Roomba with a brand new battery! Am I tickled or what? If you're curious about them, YouTube has videos of them with/without animal interactions and with/without hackers' adaptations. PS: It ran from 12:35 to 2:23, only pausing for me to empty the dust bin and untangle a couple of cat toys. 108 minutes!

January 21, 2008

Returning with 'Poo-free Hair

Last May, Kathy at A Vast Amount of Spare Time posted about not using shampoo to wash her hair. Hmm, I thought. Maybe this will cure those little bumps I get on my scalp. After some experimenting, denial, and accidental or unavoidable use of shampoo, I've settled on a variation of her baking soda and vinegar regimen.

In my shower, I keep a former shampoo bottle (well rinsed!) that has a small dispensing hole (a dish detergent bottle would work, too) with baking soda and water. I start with 1/2 soda, but as the level falls with use, I add water. The quantity of soda isn't critical and depends on how much hair and how big a head you have. If you don't have a funnel for the soda, mix the solution in a pitcher or big measuring cup and pour into the bottle. I also keep a spray bottle filled with water and vinegar (Kathy suggests apple cider, but I had white on hand), about 1/4 vinegar.

To clean my hair, I wet it well, shake the soda bottle (finger over the hole) and apply a spiral on my hair (usual two circuits starting near the edge and finishing near the crown), massage into the scalp with my fingertips, rub all over with my palms and fingers, and rinse well. (You'll get some dribble and you can use it to clean behind/in your ears or even your face and neck. It's mildly abrasive which can be good.) Once the soda is rinsed out and my hair is still very wet, I grab the vinegar spray bottle, close my eyes, spray a few times (maybe 4, again, your mileage may vary) around my head, rub it around around a little bit to distribute, and rinse. You can, if you wish, use the vinegar rinse on alternate days or even less frequently. It does ensure there's no soda left in the hair and makes your hair shinier than with soda alone.

I found the measuring cup method to be cumbersome and much prefer the premixed solutions. And it did take a week to get my scalp and hair used to the change. Those little scalp bumps don't appear when I use the soda and vinegar, either. Even baby shampoo causes them. Additional benefits of this system are its very low cost and small environmental impact.

Regarding knitting, I'll have posts about completed projects (including my Mystery Stole 3), my new-to-me spinning wheel and an incredible fiber purchase via Craigslist, and so on soon. I've been a bad blogger.

June 02, 2007

Score!

This is not a post about sports, unless thrift store shopping is a sport. Maybe it is!


I've been watching out for wool sport yarn for more wrist warmer. Ta dah! And the worsted is already being knitted up into a striped Greensburg block. As a junking friend would say, "fitty cents each!"


This is an 8.5 ounce wheel of icelandic wool. I looked up what new wool costs. This wheel cost 14% the price of new. Not a bad discount. Last winter I knit several hats from similar almost-unspun-wool and I and the recipients liked the results very much. I might try spinning this or I might make more hats.


These three cones are, left to right, silk, 12+ ounces of shetland wool, and 21+ ounces of mystery wool. The silk was in my stash already and I'm showing it here because I'm thinking of stranding it with the shetland for socks. The green could be a blend, but the burn test revealed animal fiber for sure. I'm thinking of overdying and using it to practice dyeing techniques like painting and making self-striping yarn. The tiny white daisies and tinier violet flowers make my faux lawn pretty. Under my Hawthorne tree, there's even a big patch of real violets that bloom in the early spring. They're part of the reason I don't put weed killers on it.

The two bags of assorted yarns included other useful things, including sewing thread, nylon twine, "Knit-more Spunstraw" rayon yarn, and 4 spools of metallic #10 threads. Some has already gone into a bag for Scrap, but most is for me.

I love thrift stores!

May 30, 2007

Acci-dental Stitch Markers


The replacement heads for my electric toothbrush come with rings for color coding family members' brushes. They make good and free (if one doesn't buy the brushes to get the rings!) stitch markers! Shown here on a size 8 US needle.

BTW, an electric toothbrush is a simple tool for improving dental health and saving money. Since I got my Braun several years ago (less than $25 for a rechargeable model, and replacement brushes at 1/5 retail via eBay) my gums are healthier, my teeth cleaner, and no new cavities. Your mileage may vary. LOL

May 08, 2007

Playing with Fire: RRR Striped Candles

Despite a lapse in blogging, I'm still knitting, but it's not blogworthy yet. Last night I 1) punched a hole in my left index finger with the knitting needle (size 3, cotton blend yarn with zero stretch, say no more) and 2) ripped back over half way because the object was too big and I want to do the sides differently. I'm making this thing up as I go.

So in the mean time, an earth-friendly project for you to try: RRR Striped Candles.

First, an explanation of my RRR claims for this project:

Reduce: Buy fewer candles by using all the wax you already have. Melt wax without using gas or electricity (yes, it takes longer to melt wax over candle flames, but that's why I call it "playing with fire! LOL).

Reuse: Use your candle and canning jars over and over again, and reuse metal wick bases.

Recycle: Melt "used up" candles into new ones, and use bits of metal for wick bases.

Cautions and Warnings: Playing with fire can be dangerous. Choose a fire-proof work surface and do not leave burning/melting wax unattended. Keep children and pets away. Use potholders or gloves to avoid burning yourself. Use your noggin!


Materials:
  • Wire core candle wick (I use Yaley Medium Wire, item number 110161 (yes, a 75 yard spool, purchased with a 40% off coupon long ago)
  • Wax scraps (remains in jar candles, taper stubs, faded votives, etc., but NO CRAYONS--it is a myth that they're good for coloring candles)
  • Wide mouth canning jars (pint, half pint) or clean, empty candle jars
  • Potholder(s) or gripper-dot gardening gloves you don't mind getting waxy
  • Timer
  • Optional: bowl with ice cubes and water, or refrigerator, or cold outdoors.
Method:
  1. Set up a couple of jars as shown here on a fireproof surface such as your stove top, large cooky sheet, or sink with the drain stoppered (you DO NOT want to get wax down the drain). Light the candle in the lower jar and put bits of wax to melt in the upper jar. Don't put too much wax in; you don't want it to overflow.

  2. While the first stripe is melting, prepare the wick. It should be about an inch longer than the target jar is deep and needs a small metal base. You can use a used base or fashion one from an all metal paperclip, pour spout, or whatever is in your metal recycling bin. The idea is to have enough horizontal surface to hold the wick upright.

  3. Even though the wax isn't ready to pour a stripe, pour a puddle into the bottom of the target jar and stick the wick base in it, centering the wick in the jar and supporting the wick until the wax hardens enough to support the wick. Straighten the wick gently.

  4. Now wait for the timer to ring. When it does, check the melting wax. If necessary, you can reset the timer. You can also sneak in a few more bits of wax if there's room.

  5. When there's a good-sized puddle of melted wax in the upper jar, use your potholders/gloves to pour it into the target jar. Put the target jar in a cooler spot than next to the burning candle.

  6. Repeat.
Nuances for Success:
  • The candles I liked best had stripes in the same color family. This is one way of experimenting with color theory; you can try adding bits of blue, green, and yellow wax to red to vary the colors of the stripes, for example.
  • To get wax out of containers too small to melt in, put them in the freezer for a while and then bang them on a padded hard surface (e.g. potholder or folded towel on the counter). Wax shrinks when it's cold.
  • For better melting and burning, mix types of candle wax (taper, jar, votive, paraffin wax, beeswax) to sort of "average" the wax. Each type has different characteristics and melting points.
  • To prevent the hole-in-the-middle problem from wax cooling more slowly in the middle, pour shallow stripes and let the candle cool really well between pours. A shallow stripe will still "dish" a little, but much less than a deep stripe.
  • To prevent bits of wick, black gunk, or wick bases from being poured into the target jars, pour slowly and then scrape the gunk out with an ice pop stick (or similar object) before adding more wax.
  • If you have really dirty wax, you can pour hot wax through a filter of some kind. I used a piece of calico in a beat up wire strainer. Or line a metal funnel with fabric or coffee filter. Just be careful not to spill wax all over!
  • For faster results, set up several pairs of jars and target jars.
  • After each pour, encourage the wick to stay in the center.
  • To relieve boredom, knit between rings of the timer. Or even do housework. Nah!
Cleaning Up:

While a freshly-emptied jar is still hot, wipe it inside and out with absorbent paper (which makes good fire starter later if you have a wood stove or fireplace). If you don't see any more wax, you can wash it safely.

If you have a bunch of candle holders or containers that need cleaning, you can put them upside down on a paper-covered cooky sheet and bake at 200 degrees for 10 minutes. Most of the wax runs down into the paper. Wipe the hot containers with absorbent paper and wash. Again, the waxy paper is good for fire starting. You could also compost it (assuming no metal is attached), but you shouldn't recycle it.

Enjoying the Results:

The pint canning jar candles with the size of wire wick I use burn down leaving a coating of wax on the sides about 1/8 to 1/4 inch thick. It makes for an attractive glow. When the candle burns out, I'll be able to put a votive in the bottom to continue enjoying the glow.

One of the negative side effects of burning candles is soot. I have found that I can prevent much of the soot by 1) putting the candle out by pushing the wick briefly into its pool of wax using a chopstick and 2) trimming wicks to a quarter inch before lighting them again.

As Annie says, burn, baby, burn!


February 20, 2007

Needle Rolls: An Epic Adventure

This is the first needle roll I ever made (in high school!); its wool felt, not the acrylic stuff mostly available these days. It used to cost 10 cents a "square" at Newberry's, and I went through a lot of it.


Several decades later, I made this needle roll for my nephew-the-knitter for Christmas this year. The denim is from a skirt, and the three black & white fabrics are quilt scraps.


Inside the roll, you can see the three-layer pockets with a couple pair of needles barely visible. The width of the slots gradually increase from left to right.


Here's the other needle roll/Christmas gift I made this year, also made from reused denim.
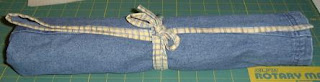

Here's the inside. I wanted the pockets to be able to hold multiple pairs of needles, so they're not flat, but puffed up. I sewed the vertical lines first, then across the bottom, pleating the excess fabric as needed. I like it much better than the flat pockets. The buttons mark the size on alternating pockets.


The color here is poor, but you can see the needle size written in permanent marker on the button. You can also see the pocket easily holds two pair of needles.

The giftee of this needle roll also has some circular needles, and after consulting with her and looking all over the web for ideas, a really odd idea occurred to me, resulting in this:

That's the bodice of the dress the denim came from. Really bizarre, but highly functional! The fabric panel sewn to the back has five slots for holding circular needles. The waist is sewn together to form a bag, and hook & loop tape is in the sholders to keep the bodice on the hanger. The needle roll, books, yarn, or whatever can be stored in the bag, and the whole thing can hang in the closet. Both Louise and I liked the idea of the slotted needle hanger for reducing kinks in the cables, but there wasn't much of the skirt left. One of the needle hangers I saw in a blog had straps attached to a slotted fabric panel for suspending on a hanger, and they provided the inspiration of using the bodice. After all, it was already the right shape for a hanger.


Now it's a few days later and I ran across a piece of lavender ultrasuede and a coordinating cotton stripe in my stash. This resulted:


Since Ultrasuede doesn't ravel, I only needed to cover the edges of the cotton fabric. By semi-sheer coincidence, the stripe fabric was about a half inch narrower than the ultrasuede, which itself was almost exactly the size you see. I trimmed the bottom edge to take the rounded corners off. The resulting 1-inch wide scrap provided the patches to secure the ends of the cotton fabric to the ultrasuede thusly:

You may be aware of my inclinations toward tightwaddery and wonder at the expensive ultrasuede. There's a thrift store in town that sells stuff by the pound, and I ran across the ultrasuede there, snapping it up and hiding it in the bottom of my basket to protect it from other shoppers. That piece cost me less than a quarter. Not that I'm bragging or anything.

I want to label the slots, but this time with rubber-stamped iron-on fabric. Maybe real Bondex iron-on patches, or maybe fabric with iron-on goo added to the back. Any thoughts? Besides reminding me I should have done it before loading the roll with needles? VBG

Chatterbox, Sox, Sox, and Stix

If I'm counting right (and I might not be), this is my 4th post today after ten days of silence. I'm like that sometimes. Anyone know of a way to schedule posts in Blogger?

Using Wendy's toe-up sock pattern, I started a pair of socks and overshot the heel shaping, causing me to have to frog over an inch of tiny tiny stitches last night. The hard part was healing the splits. Here's the most recent photo:


That's Knit Picks Essential Tweed in Flint, 60 stitches on size ZERO needles. I like the red, blue, and yellow flecks. This is my first toe-up sock. I like the concept of using all of your yarn up without having to trust the gods to dole the yarn out properly as I've done so far with my top-down socks. Like these:


My third pair of socks are done and shown to advantage on the sock blockers I made following these directions. The only suggestion I'd make is to bend both hangers together so they come out the same.

And Now for the Stix Portion of Our Program: I found some thrifty bamboo DPNs on eBay. 10cm long (that's 4 inches), 6 sets of 5 needles cost only $8.07 with shipping. I was expecting them to be less than perfect, so the need for light sanding and some beeswax was not a problem. The size zeros are shown in my toe-up socks above. I am liking them a lot, even if they do resemble toothpicks! You can see the tips of the other five pair in my DPN needle roll. The same vendor has longer DPNs, straights, and circulars, too. Just search for "10cm bamboo double" to find them. I'm skeptical of the circular joins, but sandpaper and beeswax can do wonders with wood-like items.

February 07, 2007

Stulpen Part 2 and Pills (not the wooly ones)

Deciding to exercise a little perfectionism, I frogged the Stulpen mit I showed you last time and started over. It's current state is a big improvement, as you can see here. My claim in a comment on Dave's blog that the pattern could be wrong was bogus, which I discovered after taking markers and pencil to the chart. BTW, the chart clearly shows that I have trouble counting! When I got to that point, I advanced the row counter three times instead of once (instead of breaking out the eraser; it was across the room and a cat was in my lap at the time). Once I had the cart colored and the overs/unders marked, it was EASY to follow with rare references to the symbols key. I can recommend highlighting/coloring charts.


In the non-wooly pill department, I wanted to share a simple thing I do that makes my mornings better. Behold my pill box:

I take a couple of prescription meds and some OTC supplements; combined with usual my morning blurriness, I've been known to take my medicine twice, not at all, inaccurately, or incompletely. The pill box, though labeled for a week of AM and PM doses, holds 2 weeks' worth for me. It takes moments to take my pills (no more opening/closing multiple bottles) and I can see at a glance if I took today's pills. I've tried several types of pill boxes, and this one is my current favorite because it is roomy, well made, and cheap ($1 at Dollar Tree). One small drawback is that the doors can get in the way during loading, so I use 4 clothespins to hold the doors up back-to-back. Another, and this is extremely minor, is that half the time, the days of the week are in reverse order!

January 31, 2007

Handy Online Stuff: Made-to-Order Graph Paper

Free Online Graph Paper / Grid Paper PDFs

Useful! Free! Specify what you want (say a grid matching the gauge of your current swatch), the site creates a PDF file on the fly for you to download, save (if you want to), and print at will. So no more buying a pack of 50 or more sheets when you need one or two. Way to go!

January 03, 2007

My Feet are Warm


My fuzzy feet and my own feet are toasty! The knitted ones went through one wash with jeans a couple of days ago and reached target size without additional cycles. You can still see the stitches, so they'd felt even smaller, but since I want to wear them myself, that's not going to happen. On purpose, anyway.

Knitting a couple of swatches of Fishermen's Wool in a couple needle sizes is on my to do list, so I can do some actual shrinkage calculations. Felted knit oven mitts are in consideration for upcoming gift giving, and it would be "a good thing" to get the size right without knitting multiple prototypes. That, or find a pattern and use the yarn/needles specified. Nah. Too easy. Here's where I plan to take notes so I can find them again:


A 5x7 inch, hard-covered spiral notebook with an elastic closure and 60 pages. It should cope well in knitting bags and lay flat when open. And cute, too! Only one buck at Dollar Tree. You can see it tucked into my new sock knitting bag:


Another bargain item, this time from Michael's (only $1.64 with a 50% coupon). A small (8.5x11x3 inches) denim bag just right for a ball of sock yarn and sock(s) in progress.


A Scrabble buddy says I should embroider it or something, but I like plain. Maybe I'll embroider my name and phone number in the facing inside. Or use a Sharpie! Did you see the glasses case in the sock bag? Here's what it's for:


A tightwad's sock suitcase. Of course, I had to spring for 5-inch DPNs (on sale at Fabric Depot) to fit inside, but the case was a freebie from my bottom dresser drawer. I worked on the socks at Scrabble yesterday, starting the second one and making a list of the things I need to keep in my new sock knitting bag.

Speaking of which, I want to keep some scrap yarn in there for knitting a few rounds on the toe stitches. I've tried the Kitchener Stitch and can do it OK, but once I tried knitting rounds of scrap yarn (sometimes called a chimney) to guide my grafting, I liked it better. It's more intuitive to me, and I can control the tension better. Here's a good tutorial and another one.

Enough for now before I'm tempted to report Scrabble scores and actual/near bingos from yesterday; it could only be interesting if you were there!

April 21, 2005

Magical Comb Binding Trick!

I recently dug out my "home" comb binding machine for a project, and its lingering presence on the kitchen island inspired the creation a new, tough price book out of 3x5 cards for my purse. The results looked good, but didn't work so good because it wouldn't lie flat when turned inside out. Bummer. After a few days of trying to ignore the problem, a possible solution made itself known. Comb binding before cutting into rings
I cut the comb binding apart into individual rings! They hold the cards together fine, and any page can be on top without being bent around the binding. The plastic comb (named because if you could make it lie flat it would look like a giant comb) just needs its spine to make the rings faster to attach and easier to manage. I doubt I'd want to put individual rings on very many letter-size reports, but a few custom note books is absolutely no problem.
The completed price book
Now instead of copying info into a new notebook, I can just take the notebook apart, recycle the unwanted/used cards, add some blank cards, and keep going. I could even insert 3x5 photos, pieces of greeting cards, or whatever fits in the comb binder's punch.
The open and still flat price book
What's in my price book? Mostly lists: window measurements, lists of things I'm thinking about buying, shopping lists, price comparison info for my "regular" purchases, phone numbers, ideas, things to put in my "master" planner, etc. It's rather like a PDA but doesn't need batteries and is less likely to break when dropped.